

After a long fight in the mud with your opponent, you ended up with a pawn more. The position looks extremely simple now: most pieces have disappeared, and your King and your last pawn are facing only one enemy piece, the King.
Surely this has to be an easy win. Just push the pawn, promote it to a Queen, collect the point and go watch Netflix. Right? Well, not quite.
Despite how simple this endgame looks, it’s one of the most theoretical endgames, with a bunch of things to remember. Unlucky for you, dear reader, it’s also one of the most important endgames you should learn very early in your career. But I also have good news for you: once you understand a few fundamental ideas, you’ll be able not only to recognize winning positions and defend drawn ones, but also to learn some useful principles that will help you make better decisions in other pawn endgames as well. So you won’t study only a single position that might or might not happen in your games. :)
We have a long article ahead of us, so let’s get started!
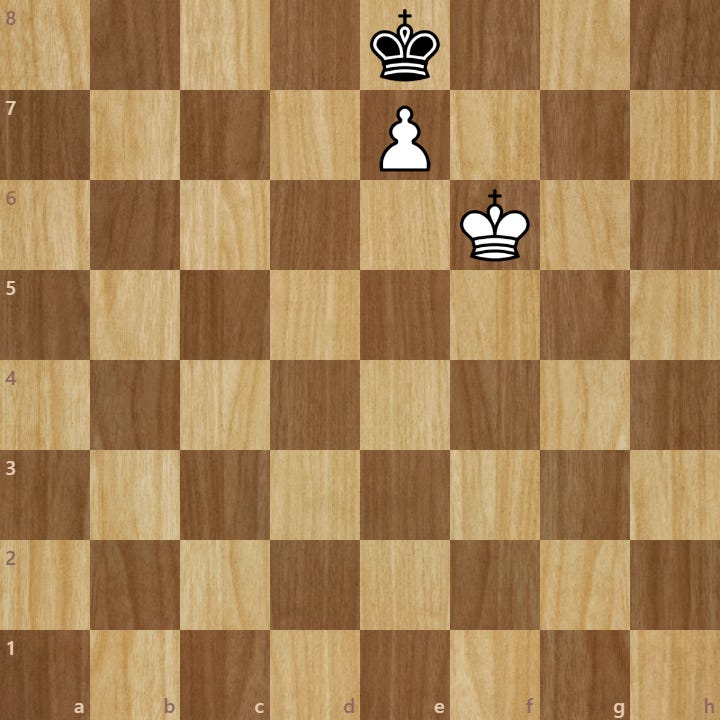
First of all, let me ask you a question: is this position winning or a draw? Take some time before you answer. We’ll discuss the answer soon. :)
I‘ve also created a LICHESS STUDY to accompany this article, with positions to help you practice the ideas. I recommend going through the chapters as you read.
The King goes first
Pay attention here! This is probably one of the most common mistakes one can make in this endgame.
When I played this endgame against less experienced players, many of them confidently marched their pawn toward promotion without a second thought. Then, when it reached the 7th rank, they happily gave me a check, only to be confused about why their pawn couldn’t go through.
I think you’ll understand better if I let the pieces speak for themselves. :)
It all went wrong when White pushed the pawn before their King even had the chance to roll out the red carpet for their small friend by controlling the squares in front of it. After that, there was no chance to kick Black’s King out of the way.
If you were paying attention, you might also have noticed that the position at move 9 is the same as the one I asked you a question about.
Zugzwang
We chess players have such a nice Eng…ahem, German word for this: zugzwang.
In chess, you make a move, then I play, then you, then me, then you, then me again… and so on. Nothing could be more fair. But in a world where one of us could say, “I pass”, instead of making a move, many positions would have a different result, and probably zugzwang wouldn’t even exist.
And that’s what this term is about: zugzwang is a situation where having to make a move comes with a disadvantage. Maybe you’d much rather pass your turn, but you don’t get to choose. You have to move, and whatever you do, you make your position worse.
The first position I showed you is a typical zugzwang, so the answer to my question depends on whose turn it is. :) Black? It’s winning for White since Black is forced to play Kd7 and allow the pawn to pass.
White? It’s a draw because they’re obliged to make a move and will either stalemate Black or abandon the pawn.
However, by this point, there wasn’t much to do anyway. Everything was ruined right at the start. If the King had led the way instead of the pawn, like we discussed earlier, this disaster could have been avoided. Simple? Hmm, maybe not quite yet.
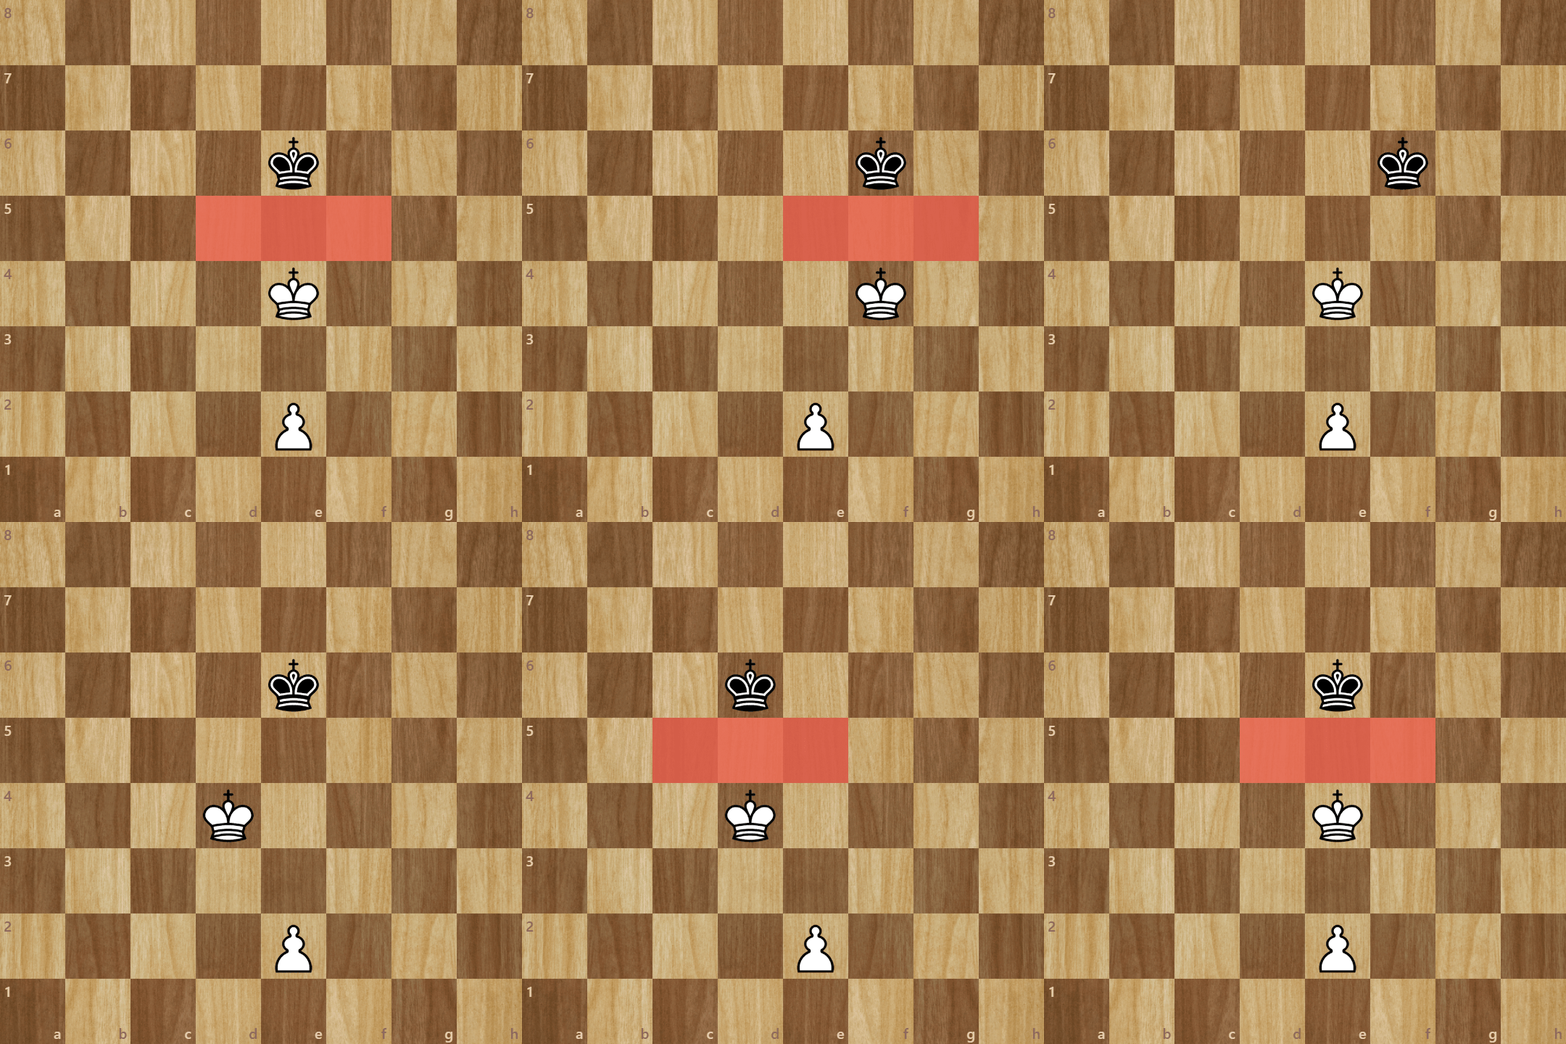
White sent their Majesty first, yet, here they are. Stuck. Great.
Opposition
If you’ve already studied your fair share of endgames, you probably saw this one coming. If not, let me explain. And if you have, let’s see if I can actually tell you something new about it. :)
I remember when I was a child, our chess coach would make us play King vs. King from their starting positions. The first player to reach the other side of the board won. The point was to make us realize how crucial opposition is, whether we were attacking or defending. Although, I can’t say we got to this clear conclusion by ourselves, haha.
There’re a few definitions and different types of opposition, but I don’t want to overwhelm you with all of them just yet, so we’ll focus only on two: direct and distant opposition.
I think the easiest way to recognize it on the board is when the two Kings face each other on the same file (or rank) and same color (with an odd number of squares between them). For this to work best, there shouldn’t be any pieces in between and it helps if you’re in an endgame. :)
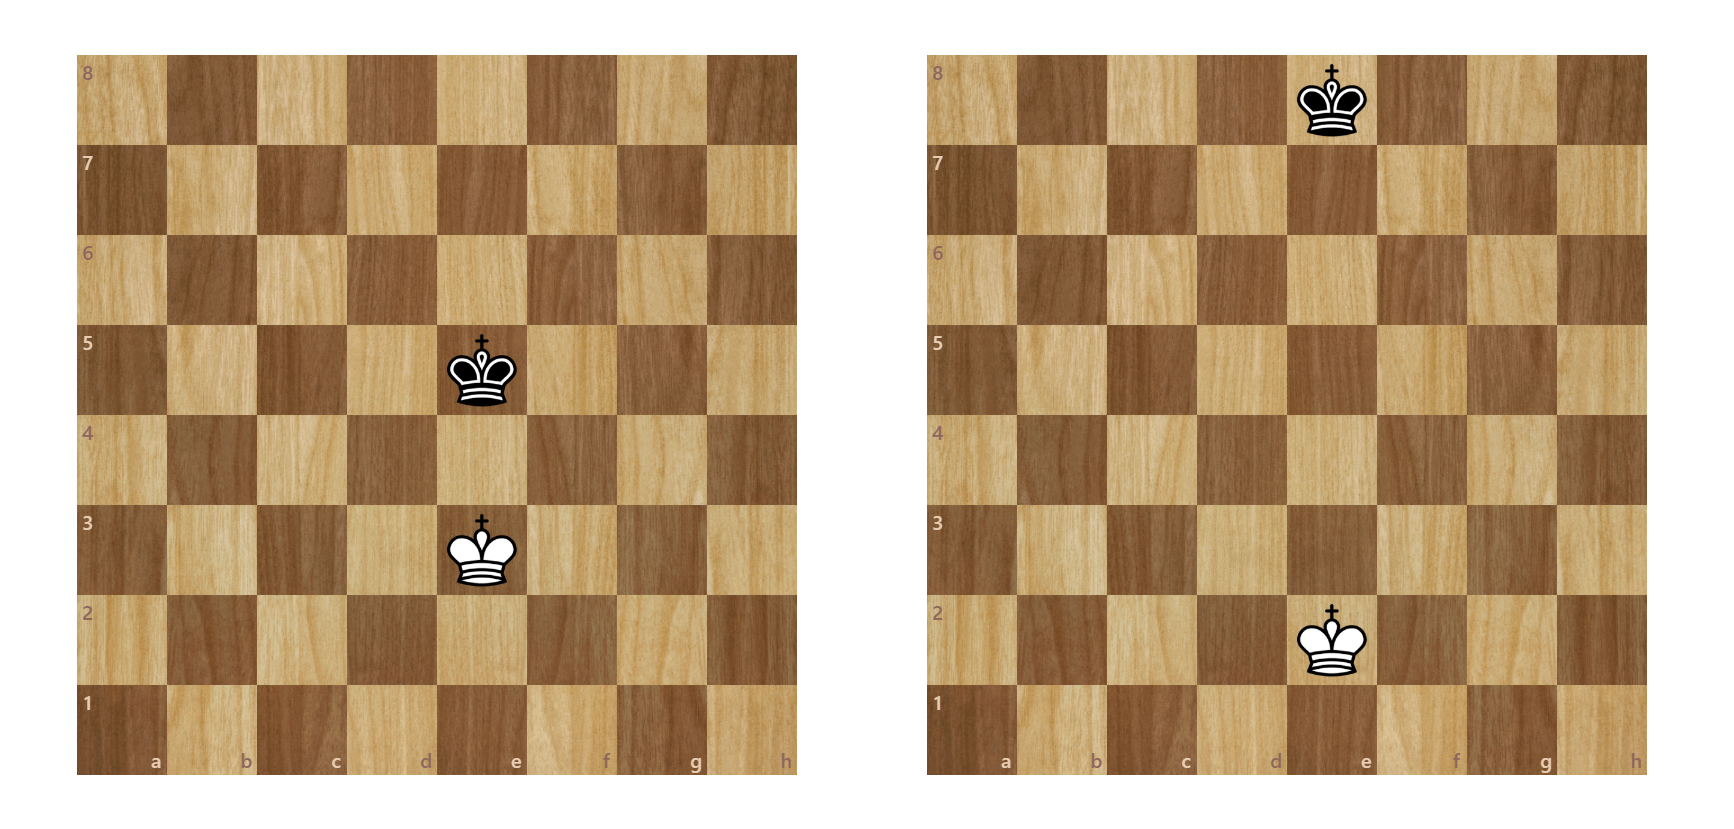
It’s a special situation because when their Majesties are in direct opposition, there’s a little “three-square wall” between them. Neither King can step to a square next to the other (according to the latest FIDE rules :)).
Distant opposition is pretty much the same, but the Kings have more squares in between them. It can be useful because it lets one of them control the other King’s approach from several squares away, eventually creating a direct opposition.
Whether it’s direct or distant, whoever was the last to step into it often has the opposition, and the other must give it up. Which can often be tragic for their result.
Imagine it like the ring in The Lord of the Rings: it’s precioussss. Everyone wants it, but for different reasons.
The attacker wants the opposition because, when the defending King has to step aside, they can advance into enemy territory. Little by little, they can shoo the defender away from the squares they want to reach.
The defender, on the other hand, wants to hold the opposition to stop the attacking King from intruding. If they succeed, their opponent will reluctantly agree to a draw.
This little manoeuvre is so important that, depending on who has or can take the opposition, you can often tell whether the position can be won or drawn!
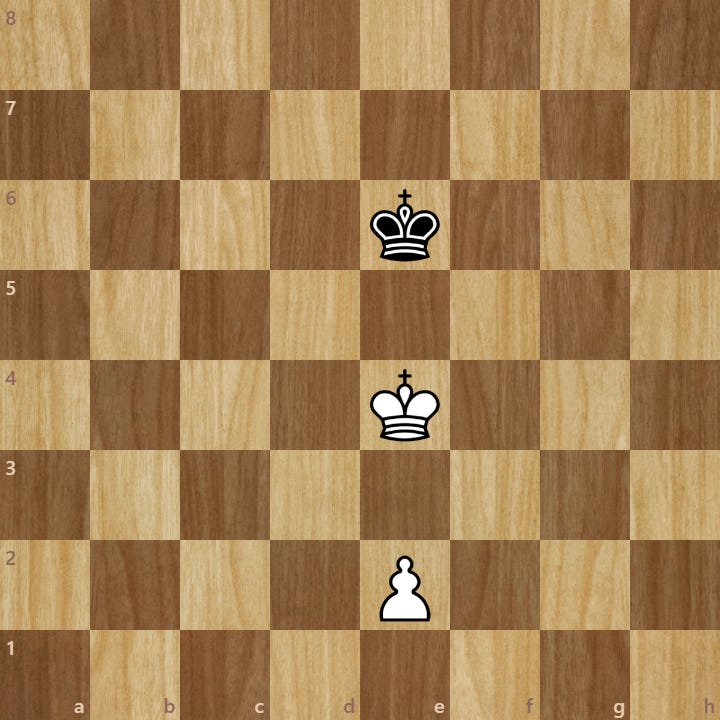
So based on what I said earlier, clearly this has to be winning for White, if Black is to move, they have to give up opposition. It’s a draw if White to play, for the same reasons. Or not?
Key squares
At this point, I swear we chess players love to name everything. What on Earth are the key squares and why are they important?
If the attacking King manages to get these squares, they’ll definitely secure the win (if they play well :)), regardless of who has the opposition at the moment.
I don’t want to give you a headache, so I’ll leave the complicated written explanations of exactly where these squares are to the books on the subject. I’d rather show you:
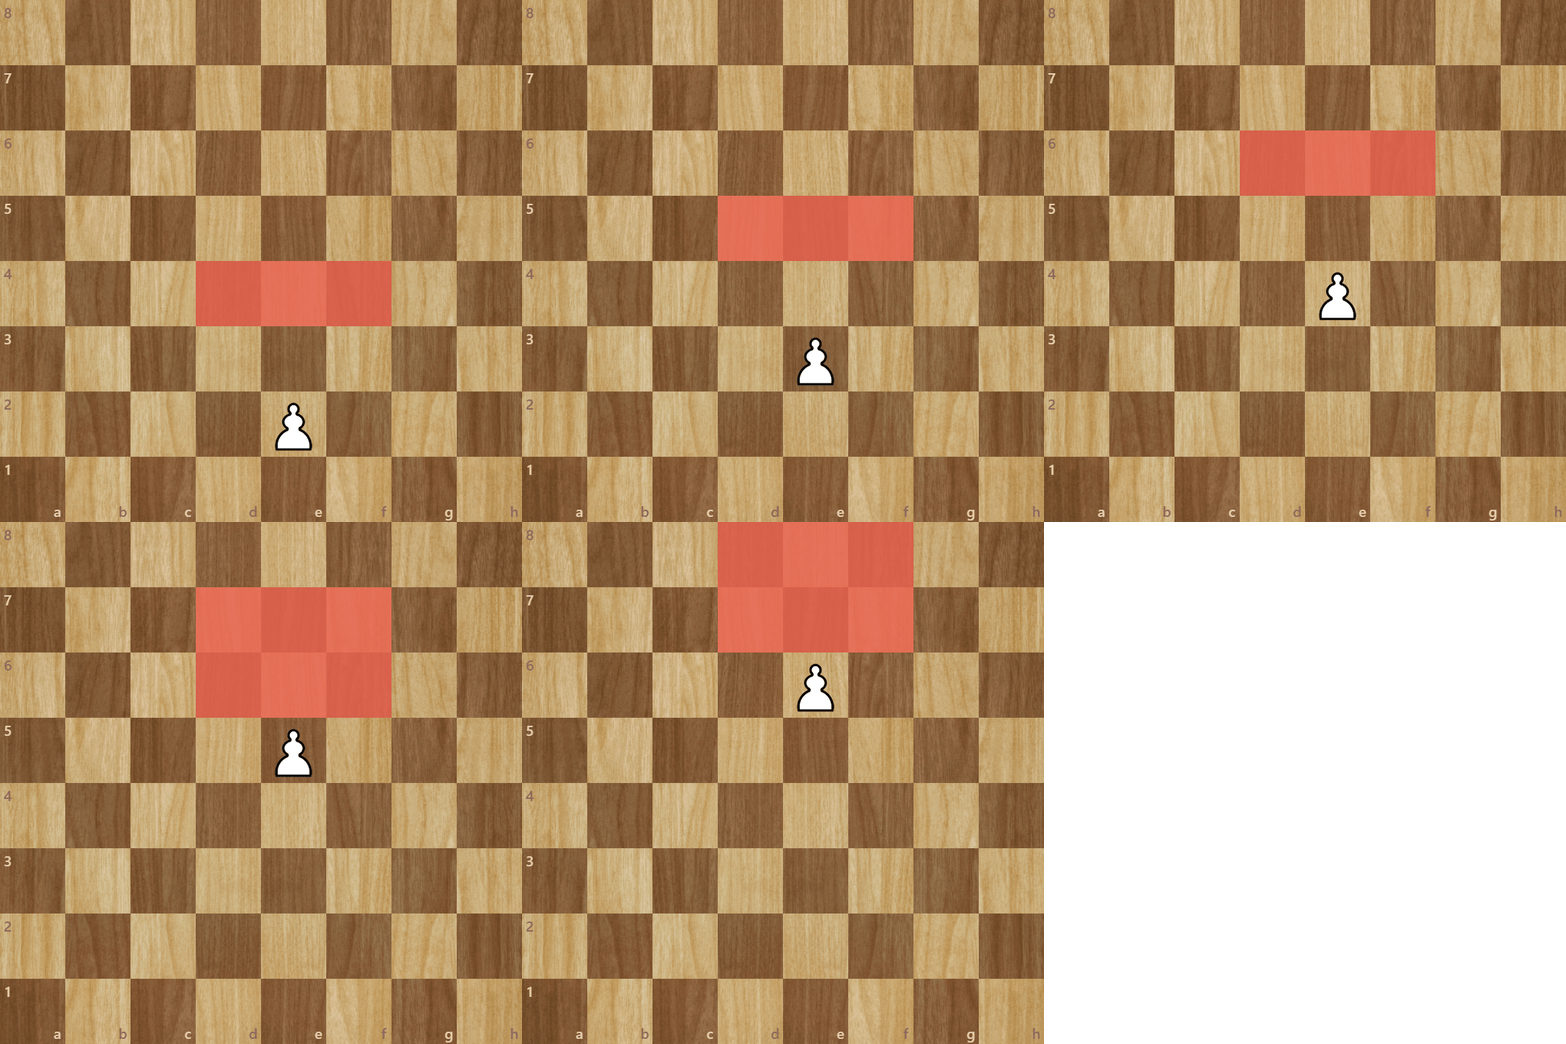
They depend on the pawn’s exact location. As you can see, as soon as the pawn crosses the half of the board, there are three extra key squares. The key squares work the same way for every pawn (in this endgame!), except for the Rook pawns (a and h).
These squares are special because if there’s at least one rank between your pawn and your King, you can regain the opposition with a little trick, even if you don’t currently have it! Can you guess which? :)
You can push the pawn one square ahead, and suddenly it’s the defender that needs to step out of the opposition. This is another good reason why your King should go first: the more squares there are between your pieces, the more waiting moves you have.
But what about those extra squares once the pawn has crossed the halfway line? We can no longer use the pawn as a waiting move, so why are those squares still useful? The reason is that once our opponent’s King reaches the edge of the board, its legal moves will be seriously limited, and we’ll be able to force it away by putting the defender in zugzwang.
Promoting the pawn
Now that you know the most important concepts, let’s see what this endgame looks like in the big picture:
Extras
Whew, that was a lot to remember! But if you’re still here with me, hungry for more knowledge, there are a few more things worth knowing.
Everything we’ve discussed so far applies to most pawns, but we have a needy pawn and a clear troublemaker.
The Knight pawns (b- and g-pawns)
These pawns work much like their more central siblings. They have their key squares, they need their King to support them, and opposition is still precious. However, they’re a bit needier for attention, and they can misbehave if you don’t give them special care.
When your pawn reaches the fifth rank, it’s tempting to think that you’re through the worst, and nothing can stop you from promotion. But if you are careless, you might accidentally leave the defending King with no legal moves, since we’re all too close to the side of the board.
Don’t rush the pawn forward without checking what happens next, because you might end up with a stalemate instead of a Queen. If necessary, give your opponent a little breathing room by moving your King toward the edge of the board.
The Rook pawns (a and h pawns)
Ah yes, the usual troublemakers. They might have gotten offended that we put them on the side, as they’re always different in endgames either in a good or bad way.
They have only one neighbouring file, which means we have just two files to work with if we don’t want to stray too far from the pawn. The attacker would need a z-file or an i-file to get around the defender properly. However, if they attempt something similar, their opponent will call the arbiter.
But not all is lost, there is one way to win if the Kings are close:
Otherwise, if the defending King is already peacefully resting under the pawn, or if the attacker can’t gain control of the defender’s key squares, only the pawnless side will go home happy.
That was probably too much information. I hope your head isn’t spinning too much.
Now that you've learned the secrets, don’t forget to check out the LICHESS STUDY to test your understanding and explore a few more positions. Maybe you’ll even acquire the superpower of knowing at a glance which pawn endgames are won or drawn.
Of course, these principles are only part of the story. In more complicated positions, you'll still need to calculate accurately to put these principles to good use. Practice will definitely be needed, as understanding chess concepts and actually being able to apply them in a game are two very different things. And I wouldn’t want to have your unfortunate result on my conscience. :)
If you’re looking for more personalized help with your chess, you can find information about my coaching HERE.
Until next time, may all your pawns promote and your opponents never swindle you into a stalemate. :)
Not against me, though.